How to Upload Your School Domain to Your Computer
Active Directory (Advertisement) is a decades-former engineering that thousands of organizations utilize every twenty-four hour period. To accept advantage of Advert, you must bring together computers to an AD domain. You may not realize there are many unlike ways to do that, some meliorate than others. Read on to learn how.
Practice you accept compromised passwords in your Active Directory? Discover out with Specops Password Auditor Free.
In this tutorial, you volition larn how to add a computer to a domain using the Windows GUI and command-line with the netdom utility and PowerShell.
Prerequisites
If you'd like to follow along with all of the steps in this tutorial, ensure you have the post-obit:
- An Agile Directory domain. This tutorial will exist using a domain called homelab.local.
- A Windows 10 Pro, Enterprise, or Education computer in a workgroup that can access an Advertizing domain controller. Non all versions of Windows 10 tin exist joined to a domain. This tutorial will use a figurer called Win10Demo.
- An AD user business relationship with permissions to add a computer to a domain. Find more information on how to observe what permissions are needed hither.
- Access to Agile Directory Users and Computers (ADUC) on a domain controller (to ostend the domain join).
- The Remote Server Administration Tools (RSAT) package to utilize the command-line
Adding a Computer to a Domain via the GUI
I of the most common means to add a computer to an Advertisement domain is the GUI. This arroyo is skilful when you need to just add together a unmarried or a few computers at once. This method is non proficient for calculation multiple computers at one time. That'll be later.
Assuming you're on a Windows 10 workgroup figurer that can access an existing domain controller:
i. Run the control sysdm.cpl. This command will open the System Properties command console applet.
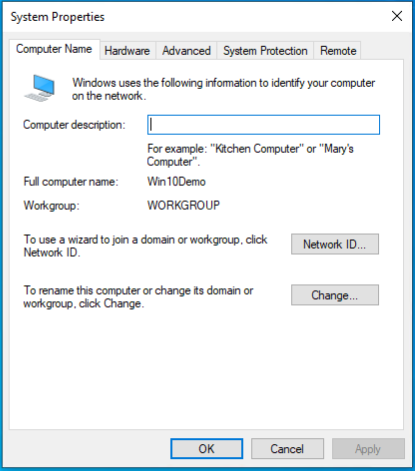
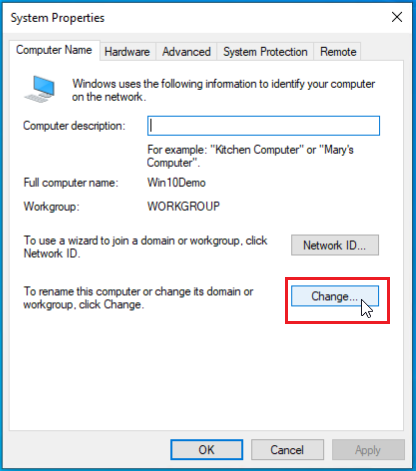
2. On the System Properties screen, click the Alter button. This button will bring up the Computer Proper name/Domain Changes dialog box.
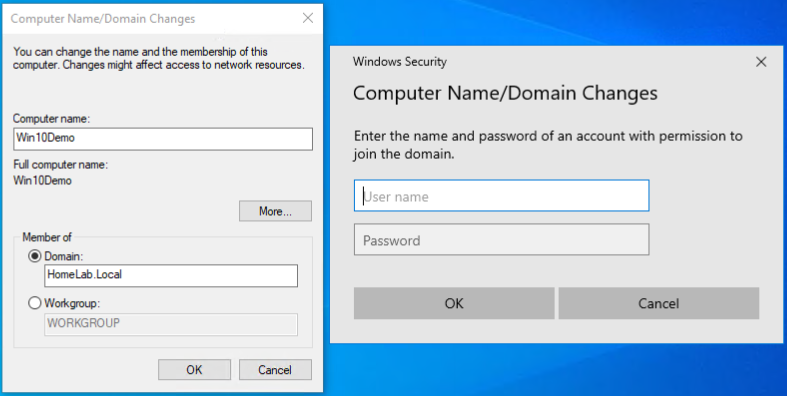
3. You lot can see beneath this computer is in a workgroup called WORKGROUP. In the Reckoner Name/Domain Changes dialog box, click on the Domain radio selection to input a domain to add together this estimator to.
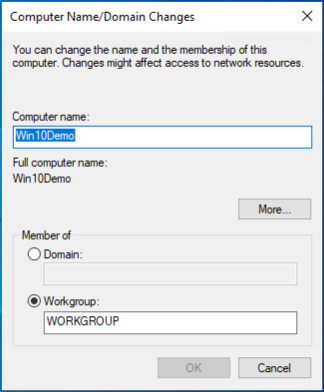
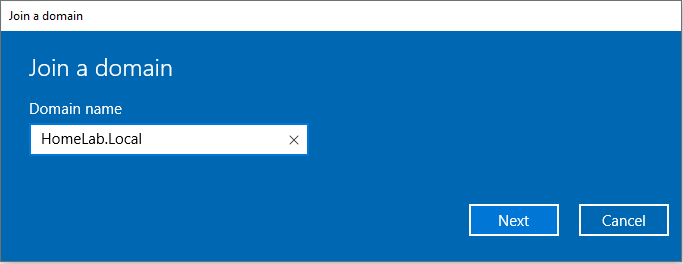
Estimator Name/Domain Name Alter Dialog box
4. Input the proper name of the domain to add the computer to in the Domain box and click OK. The calculator will so attempt to contact a domain controller and add itself to the domain.
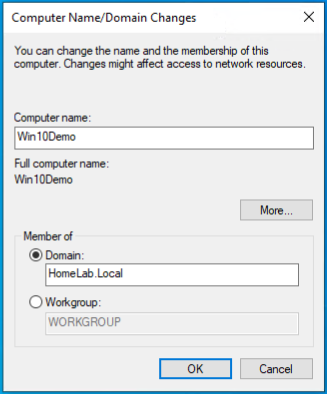
Computer Proper name/Domain Name Change Dialog box
If your computer is not able to contact the domain name you entered immediately, it throws the below error: If the estimator cannot contact a domain controller, ensure the computer'due south DNS server points to a domain controller. The computer must exist able to find the DNS SRV tape to find a domain controller.
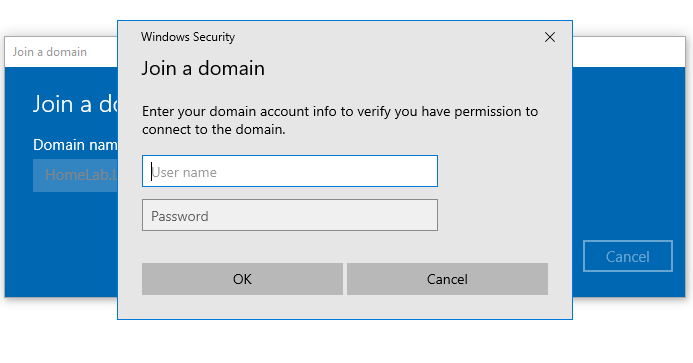
5. If the reckoner can contact a domain controller, it will prompt you for a username and password, as shown below. Input a user account with permissions to add this computer to the domain and click OK.
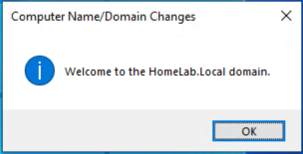
half-dozen. If all goes well, you will receive a message welcoming you lot to the domain as shown below. At this time, the computer creates an AD calculator object. Click OK.
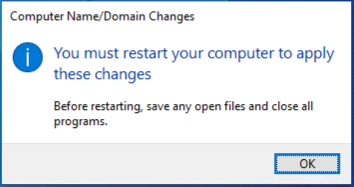
7. Click on OK again to confirm the need to restart the computer.
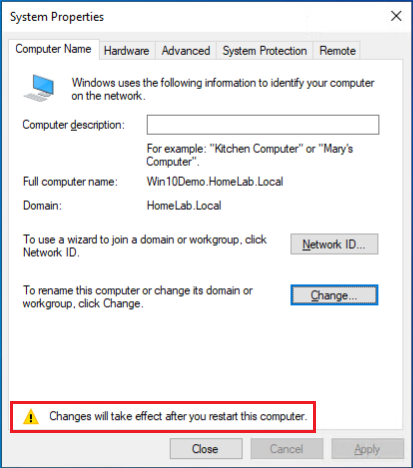
viii. You'll so be redirected back to the System Properties dialog box, but now you will see a warning (Changes will have effect after you restart this computer.) Click on Close.
ix. In one case you click on Close, Windows will prompt y'all to restart at present. Click on Restart now to restart the computer immediately.
Adding a Local Computer to a Domain via Settings app
Steps explained below are but available in Windows10 20H2 version. These steps may change in future windows10 versions.
ane. Right click on beginning menu and click settings.
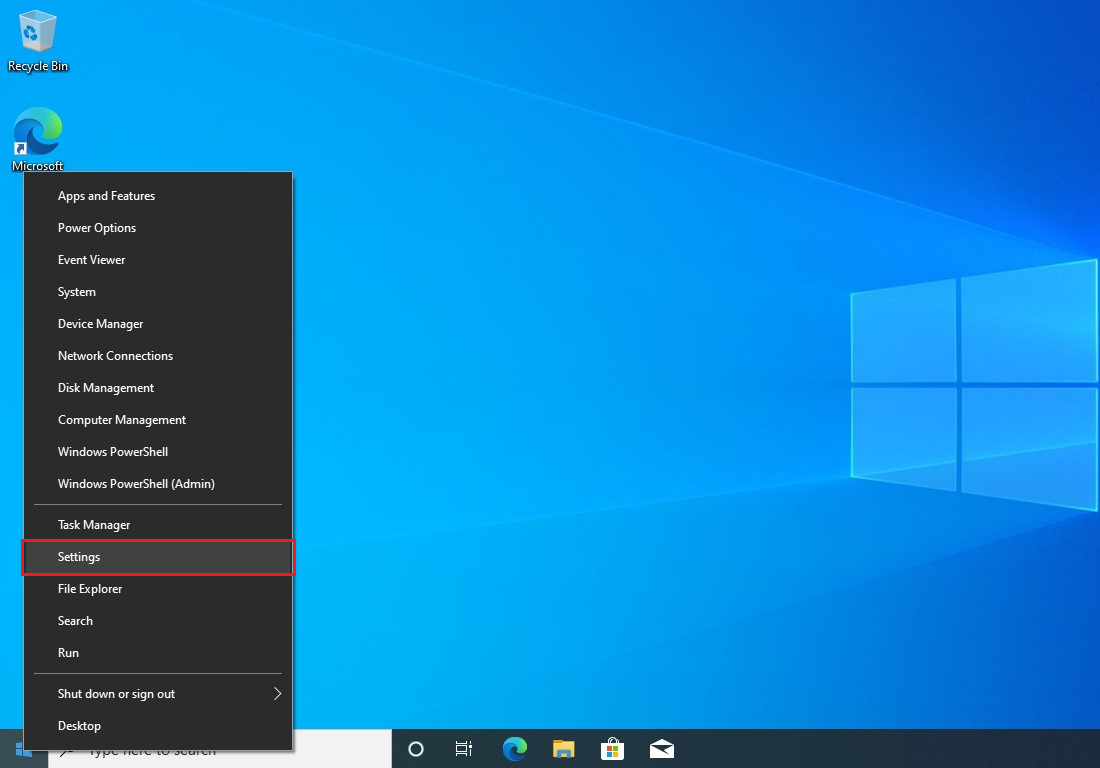
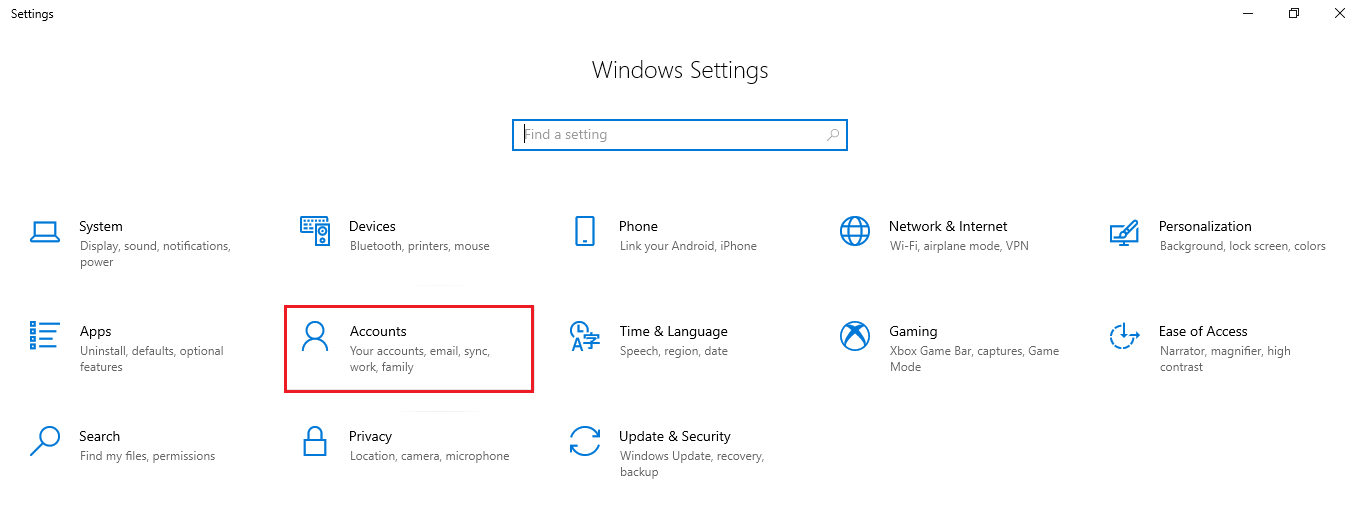
2. Under settings, click on accounts
iii. In the side by side folio, click on "Admission Work or School" option and click on connect option to the right.
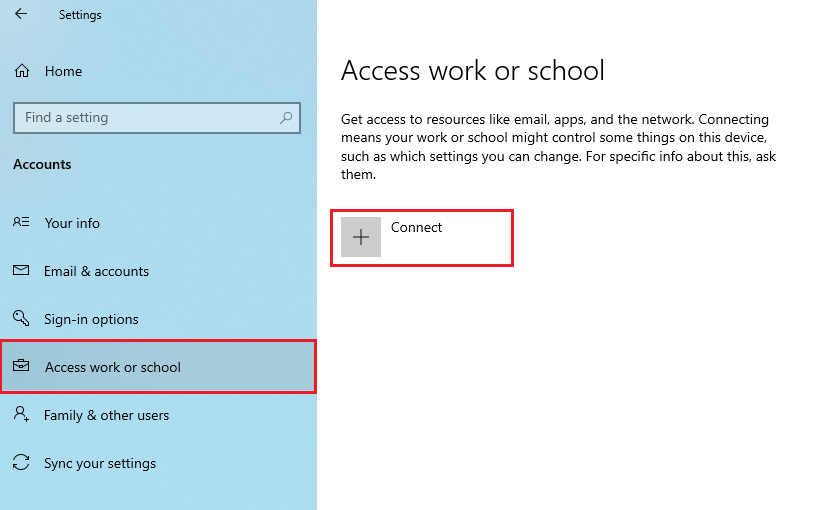
4. As we are going to bring together this machine to local Active Directory Domain, in the Microsoft account dialog box, click "Join this device to local Active Directory Domain" choice and click Next.

five. In the next page, enter your domain name and click Next.
6. If the computer tin contact a domain controller, information technology will prompt yous for a username and password, as shown below. Input a user business relationship with permissions to add this computer to the domain and click OK.
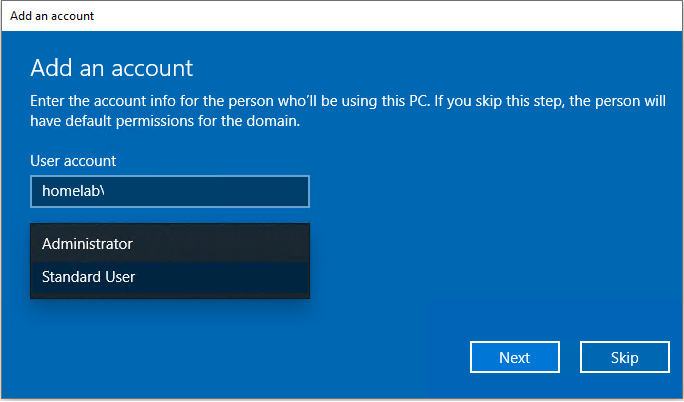
7. In the next page, select the account type who will utilise this machine.
- If you select administrator, the userid that you used to add this machine to domain, will be added to the local administrators grouping on the car.
- If you select standard user, it will not add the userid to local administrators group. You can too skip it and continue to adjacent folio. For this demo, lets select standard user and click Next.
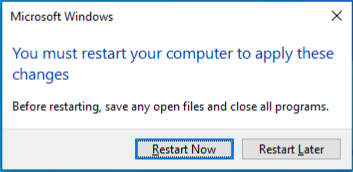
8. Click Restart now to restart the estimator immediately.

9. One time restarted yous can login to the machine with a domain user id.
Adding a Local Calculator to a Domain via Netdom
And so far, you have seen how to add a Windows 10 computer to the domain via GUI, but you don't have to employ the GUI. Instead, y'all can use the command-line using the netdom utility. Netdom is a control-line tool that comes with the RSAT package.
Assuming you're on a Windows 10 workgroup computer that can access an existing domain controller:
1. Open upward cmd.exe equally administrator.
two. Run netdom join providing the following parameters.
Netdom requires a computer name right afterwards the
joinparameter. If you're using this command on other computers, supercede the value with the variable%computername%to always represent the local computer.
netdom.exe join %computername% /domain:DomainName /UserD:DomainName\UserName /PasswordD:Password 
iii. Now restart the computer and the reckoner volition be joined to the domain.
Calculation a Local Computer to a Domain via PowerShell
If you have many computers to add to a domain, have an onboarding automation process, or adopt the command-line, you tin use PowerShell to add a reckoner to a domain.
Assuming you're on a Windows 10 workgroup computer that can access an existing domain controller:
1. Open Windows PowerShell ensuring yous run information technology as administrator.
In the PowerShell console, run the Add-Calculator cmdlet. This cmdlet performs the same action every bit adding a computer to a domain via the GUI. Specify the domain name to add the computer to with the DomainName parameter and optionally specify the Restart parameter to restart the calculator when complete automatically.
You tin can likewise specify the
Credentialparameter to specify the username and password sooner. See this article for more information. If you'd like to add together a computer to a different OU upon cosmos, specify theOUPathparameter. For more options, runGet-Help Add-Estimator -Full.
Add together-Figurer -DomainName DomainName -Restart 
Add a Local Computer to a Domain Via WMI
To ensure this tutorial covers all ways you tin add together a computer to a domain, let's continue with a lesser-known method of using Windows Management Instrumentation (WMI). WMI is a ubiquitous part of Windows that contains loads of data about a PC and tin can perform deportment on it.
To add together a local computer to a domain with WMI, you need to invoke a WMI method. This method performs the same task every bit using netdom or the Add-Computer PowerShell cmdlet.
You can invoke WMI methods in many different ways. For this tutorial, let's focus on two ways using the *wmic* command-line utility and PowerShell.
Using WMIC
To add a estimator to a domain with WMIC:
1. Open a command prompt (cmd.exe) every bit ambassador.
ii. Run the below control. This command:
- Specifies the local computer using a where query (
where name="%computername%") - Invoke the WMI method
joindomainorworkgroup(call joindomainorworkgroup) that'south a part of the Win32_ComputerSystem WMI class (computersystem) - Specifies advisable bitwise operators to join the domain (
fjoin options three) - Adds the computer to the homelab.local domain (
homelab.local) authenticating with the labadmin user account (username="homelab\labadmin Countersign="secret")
wmic computersystem where name="%computername%" phone call joindomainorworkgroup fjoinoptions=3 proper noun="homelab.local" username="homelab\labadmin" Password="secret" 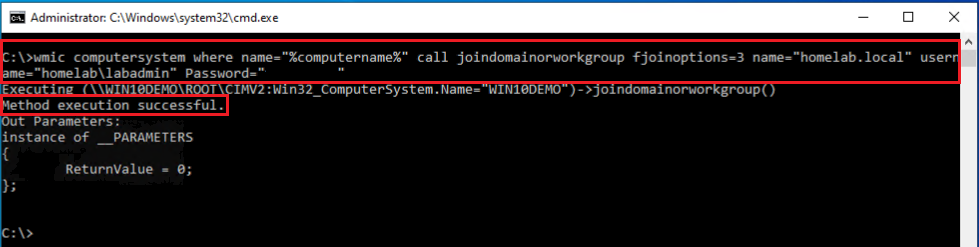
3. When completed, restart the calculator.
Using PowerShell's Get-WmiObject Cmdlet
Yous can as well invoke the JoinDomainOrWorkgroup WMI method using PowerShell. To do so:
one. Open up PowerShell equally administrator.
2. Run the post-obit control. This control performs the same task as wmic does above using the aforementioned arguments.
(Get-WMIObject -NameSpace "Root\Cimv2" -Class "Win32_ComputerSystem").JoinDomainOrWorkgroup("homelab.local","secret","homelab\labadmin",$null,3) 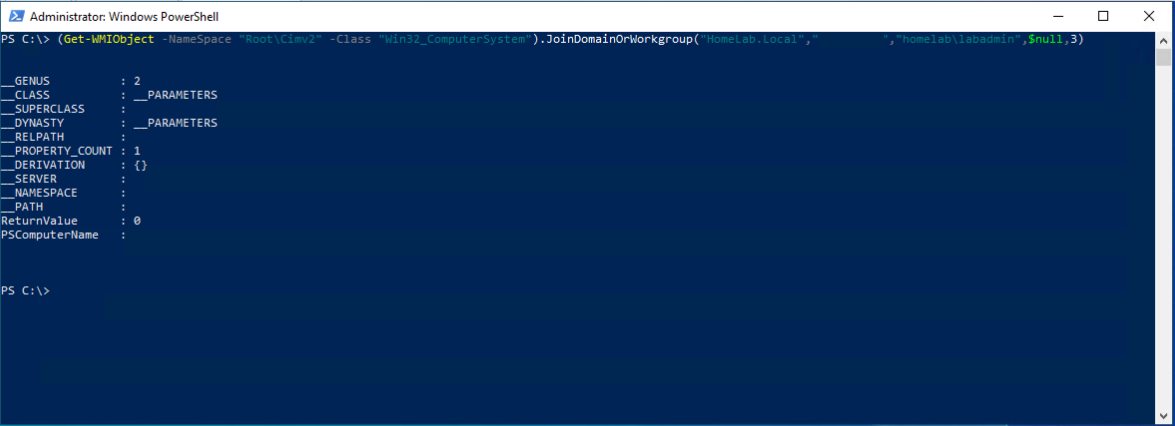
3. When completed, restart the estimator.
Calculation Computers Remotely to a Domain
Throughout this tutorial, y'all've learned how to add a estimator to a domain equally you lot're sitting in forepart of that actual computer. But what happens when yous can't sit in forepart of that computer, or you have many computers to add? In that case, PowerShell is your all-time friend.
To add computers to a domain remotely, you could either choose to employ the WMI method in PowerShell as describe to a higher place merely use the ComputerName parameter on the Get-WmiObject cmdlet or use PSRemoting.
To join remote computers to domain remotely, invoke the Add together-Figurer PowerShell cmdlet. But this time, use the ComputerName parameter.
To run the
Add-Computercmdlet remotely, you must ensure that PSRemoting is enabled on all remote computers.
one. On your local workstation (not the computer to add to a domain), open up PowerShell as administrator.
2. Run the below command. This command:
- Adds the remote calculator called win10demo (
-ComputerName win10demo) to the homelab.local domain (-DomainName homelab.local). - Uses the user01 local user on win10demo to authenticate to the remote computer (
-LocalCredential win10demo\user01) - Uses the labadmin domain account to authenticate to the domain to add the computer business relationship (
-Credential homelab\labadmin). - Volition restart the computer automatically after it completes (
-Restart)
Add-Estimator -ComputerName win10demo -LocalCredential win10demo\user01 -DomainName homelab.local -Credential homelab\labadmin -Restart In one case invoked, the Add together-Computer cmdlet will and so prompt you for passwords for the user01 and labadmin accounts. When complete, PowerShell volition restart the remote computer automatically.
Past default, the
Add-Estimatorcmdlet will not restart the remote estimator if a user is logged in. To override this, specify theForceswitch parameter to always to restart the remote calculator.
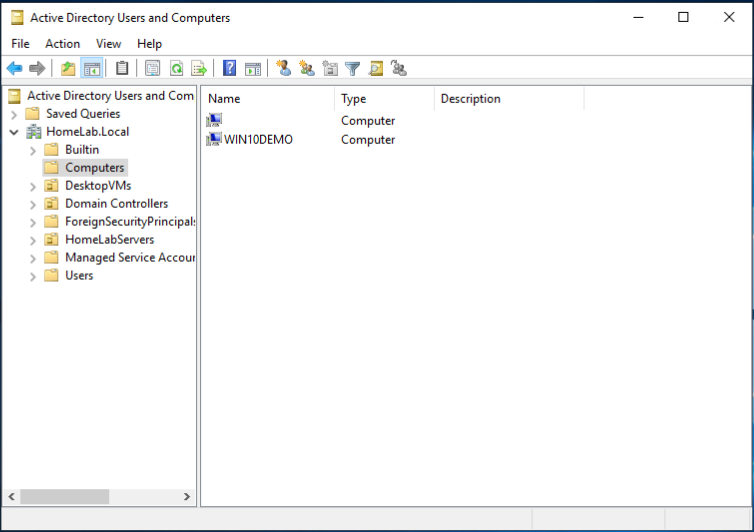
When a computer is added to a domain, it creates a calculator object. To ensure the computer created the computer object as expected, permit's open Active Directory Users and Computers (ADUC) to confirm.
1. RDP to your domain controller and open Active Directory Users and Computers (ADUC) or open up ADUC on your local computer if you have the Remote Server Administration Tools (RSAT) package installed.
2. In ADUC, aggrandize the domain proper name node (homelab.local in this case) and click on the Computers container. You should see the calculator object added in the previous section.
By default, all computers that are added to a domain volition be added under the Computers container.
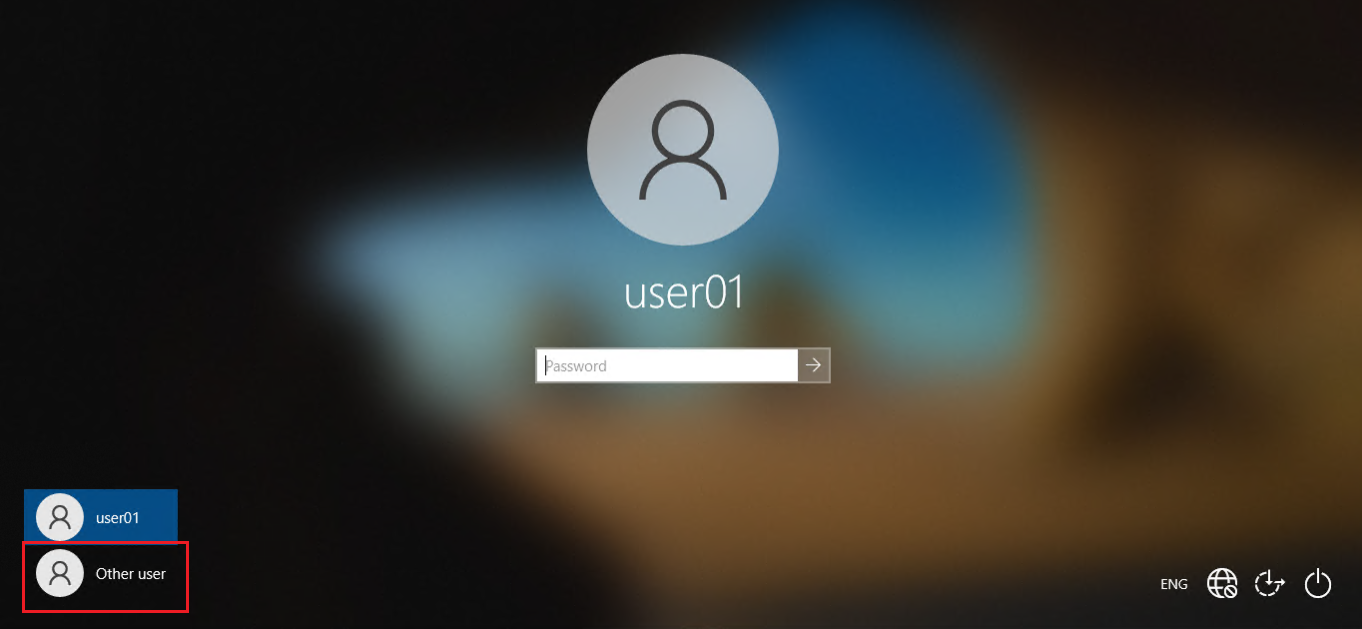
3. Back on the Windows 10 figurer, now log on with any Advert user business relationship by clicking on Other User on the login screen.
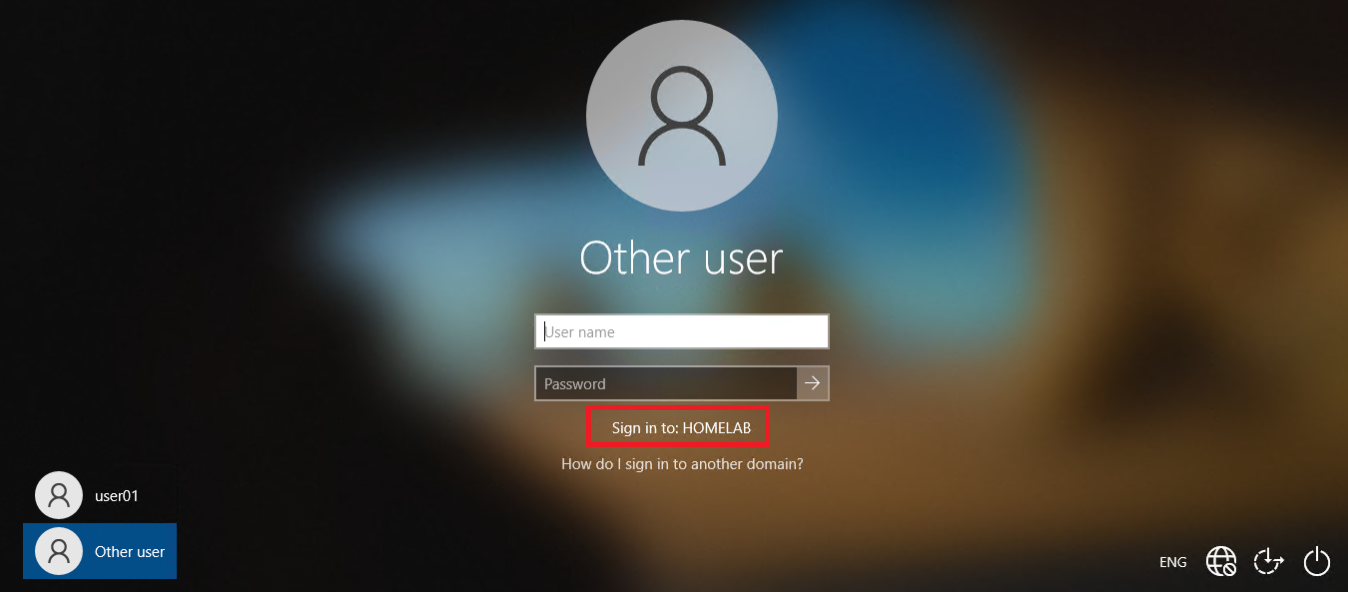
You lot tin can now see your domain proper name under the Password box as shown below.
Practice you take compromised passwords in your Active Directory? Find out with Specops Countersign Auditor Free.
Conclusion
Throughout this commodity, you lot've seen multiple means to add together computers to an Ad domain. Each method has advantages and disadvantages, simply you should now have all of the options in forepart of yous.
Now that you lot know all of the means to add a computer to a domain, how will you add your adjacent figurer to a domain?
Source: https://adamtheautomator.com/add-computer-to-domain/
0 Response to "How to Upload Your School Domain to Your Computer"
Post a Comment